
Inside my Head(Quarters)
I launched Grid + Glam at the beginning of 2018 and couldn’t have dreamed that by the end of the year I would need a dedicated headquarters to run the business. The business started with a couple of clients a month and quickly gave way to a hectic schedule where I worked during every available moment, including nights and weekends.
In order to reduce my working hours without compromising the quality of my client service, I knew I had to quickly expand my team and spend less time working on Grid + Glam’s daily functions myself. And that team needed a dedicated headquarters. Since I know that an organized and beautiful room creates a calm mind, I needed to set up my office accordingly, and create a space designed for a CEO and her team.

While completing this project, I was thinking about you all. Wouldn’t this project be the perfect way to show how I do what I do? To let you get inside my head from the start of a project to completion? So I’ve laid out in some detail the process I went through, as a microcosm of the work I do every day for Grid + Glam.
The Challenge
My most recent home office had functioned well as just that: a home office. I still needed it for this purpose, but it also had to be set it up for maximum efficiency as the Grid + Glam headquarters. And, since it is on the main floor of my house, it would need to match my house’s overall aesthetic. My challenge was clear: come up with a design scheme that would 1) increase the functionality and organization of my current home office while 2) updating the look and making it as pretty as the rest of the house. So . . . Grid + Glam! And, as an additional factor, now that my kids are getting older, I thought it would be perfect if the space could function as their homework spot in the evenings.
The new office would need to have:
- Three desks and chairs: one for me and two others for use by Grid + Glam team members by day, and by my kids for homework by night
- Space for filming videos for Bootcamps and stories for IG
- Surfaces for the printer and Cricut label maker (similar linked)
- Storage for label making and other organizing and video supplies
- Adequate filing space
- A fresh, modern and GLAM look
Once I committed to the project, I began by spending several hours measuring and re-measuring and getting a feel for the size of all the items of furniture. I played with a few different ideas and ultimately settled on a layout (actually two variations of the same layout depending on how my desk fit once it arrived). As a general rule, I try to map out as much as I possibly can ahead of time, but find that sometimes decisions needs to be deferred until I can see how everything will fit together in real life.
Next, it was time for some online shopping. Many of you might be surprised to learn that I hate shopping! But when you think about how I don’t like accumulating “stuff,” it actually makes a lot of sense. Given how busy I was and the very specific sizes I would need, online shopping allowed me to see so many different options and make progress on this project in my little pockets of time at night. In the end, the whole room makeover was done without visiting a single physical store for furniture.
The Furniture
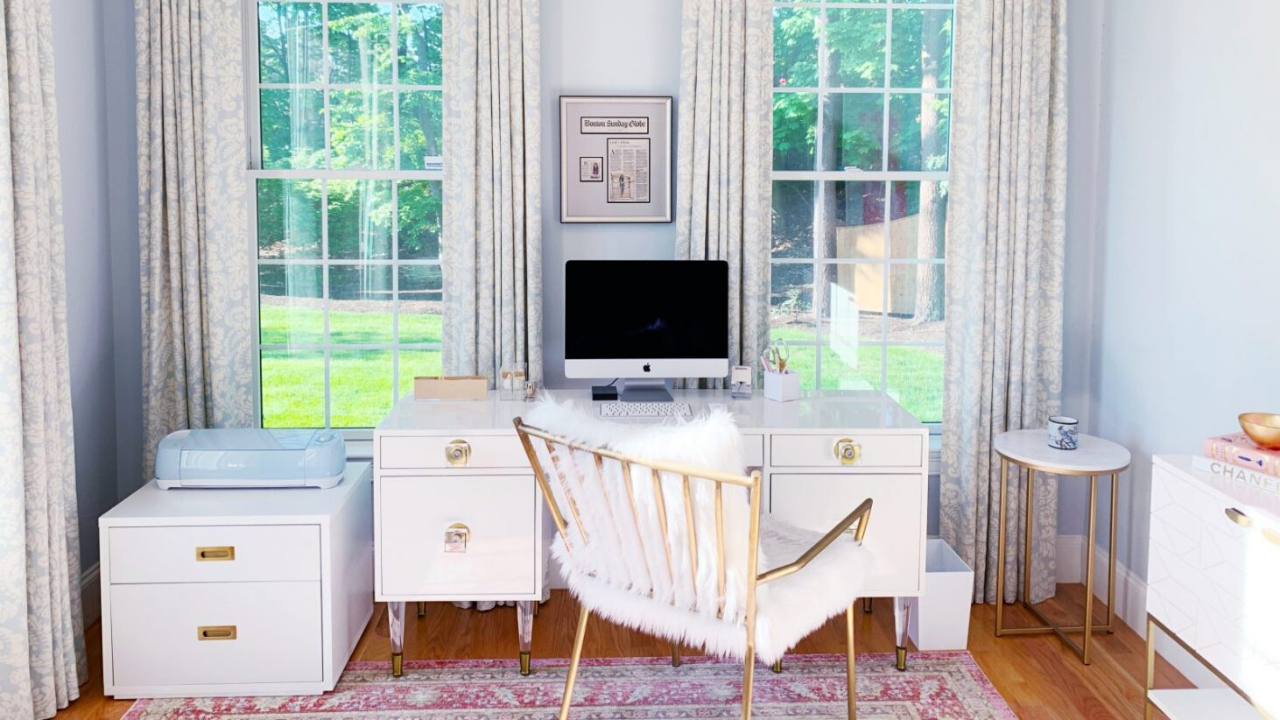
My Desk: It had to be much smaller than the original desk in the office, both for the lighter look I was going for and for the ability to squeeze more furniture into the room. Here is the desk I chose. I love clear acrylic knobs and white, clean surfaces. I also love that it has adequate drawer space for all my desk essentials, PLUS two file drawers! Since I would only need one of the drawers for files, I am able to use the other one to store all my vinyl and file labels in these bins. My desk chair (similar linked) is also super glam and super comfy.

Twin Desks: These twin desks (similar linked) were critical! Fitting two additional desks in the room would enable other organizers to work together with me in the office during the day, AND both of my kids could do their homework in there with me after school. The fact that they are open and simple allows me to have three desks in one room without it being overwhelmed by furniture. And I really loved the gold/bronze details to bring the glam. To finish it off, these simple chairs (similar linked) are surprisingly comfortable.

Console Table: This console table (which unfortunately is out of stock, and I therefore can't link) is my favorite piece! I just love the modern design and the gold details. Like everything that went into the office, it serves multiple functions and looks great while doing it. This replaced a massive bookshelf we had in the office, and holds all of my business supplies, including branded materials, labeling materials, and stationery.
Printer Table: Given most printers are wireless now, my printer did not need to be next to the computer. But we would need something small and chic, like this end table, (similar linked) for it to sit on. It was a challenge to find something narrow enough to fit in between the two desks, but wide enough to fit the whole width of the printer. It also had to have an open bottom so that it could host the router and Wi-Fi hub and other cords which had become a mess in the old office.
File Cabinet: This was another challenge because this piece had to be small enough to fit next to the desk, but wide enough to fit the entire length of the Cricut vinyl cutter that would sit on top of it. And it also had to be white and gold to match the other pieces I had already chosen. Side note, the piece I originally ordered (and had paid to be assembled!), turned out not to be a file cabinet at all. I called the company and was given a full refund for the misinformation on the site. But I had to eat the assembly cost. While the cabinet I ended up with is perfect for my purposes, I'm not linking it here because I wouldn't recommend you buy it. It was cheaply made and is not the sturdiest piece of furniture.
Now for the GLAM
With all the furniture ordered, I took a moment to be proud of all that time I put into measuring my space and finding just the right pieces. The room was multifunctional! I felt like it was definitely going to serve me well as my business continues to grow (fingers crossed!). But, I wasn’t done yet. I’d need to bring in all those other design and décor elements that would complete the room and give it the glam. I still loved the paint color and drapes of my previous home office’s design, so that saved some expense But I had a few more things to purchase before the headquarters would be complete.

Artwork: When it comes to artwork, I like simplicity. Just a few, functional but beautiful pieces would do. I had already purchased this bright painting to use as a backdrop for filming videos, and it had moved around my house over the last few months as I tried different filming locations. I was so excited to bring it into this new space. I also loved the idea of having bulletin boards (similar linked) over the two desks. I knew they would be useful for both mapping out work projects, and for any school related paperwork that might need to be displayed.
Rug: While I also still liked the original rug, there was a slight problem: it was now too small for the room. A friend suggested that a pink and blue rug could be really pretty to tie the room together given the large pink painting. And as luck would have it, the rug that I loved for our bedroom also came in pink!

Lighting: Since you can see the headquarters from the main family room, I looked for a chandelier that would tie in the overall feel of the space while giving a visual pop from outside the room. Here’s the chandelier (similar linked) I chose. Additional lighting wasn’t really necessary given the four windows, recessed lighting, and chandelier, but I just love wall sconces! So I splurged on the electrical work and mounted matching sconces above the two desks and corkboards.

The Details: That covered all the big items, but I wasn’t done yet! I wanted this to be perfect, and the little details are very important to me. So with all this white and gold in the room, I felt like any heavy black would undermine the whole thing. That meant items like the printer, tape dispenser, and stapler could not be black! So I found a white printer, (similar linked) and acrylic tape dispenser, stapler, scissors, and penholders from this set!
Out with the Old...
As you know, any transition in our homes is an opportunity to PURGE. As I designed the room, I had to determine what I would need, what could be moved to other places in the house, and what we could get rid of. That meant: 1) donating the office furniture in advance of the deliveries, 2) moving the books to the basement, 3) purging and reorganizing my office files, 4) switching out the color of the files to a pretty gray.
Putting it all Together
After all of that, the deliveries finally started coming in! One problem with doing the shopping online (and on a budget!) is that the furniture often comes unassembled. The cheaper it is, the more steps there seem to be. So I used Taskrabbit to find a local handyman who did a great job (and kept the stress level in the house low, too!). But I will take credit for assembling the console table myself! The final step might have been the most fun: the final, FINAL organizing details. I measured all the drawers (three in my desk, two each in the other desks, one in the printer table, and one in the filing cabinet) and figured out what drawer dividers I would need and what would go where. I also measured the console table cabinets to get the perfect organizing bins for all of my supplies.
Inside my Head(Quarters)
I hope this blog entry helped you see a little bit about my process. If I were to summarize my process, I’d say that I put in a lot of work at the front end, measuring and remeasuring, thinking about (and writing down!) each detail, and how they’ll fit together, then putting a lot of time into the finishing touches to make it shine. I know it sounds like a lot of work, and it was. I spent several nights measuring and shopping, and I had to manage for the delivery and construction of multiple pieces. I had to audit and move every file, move every book and photo album that had been in the bookshelf. While all of this was happening, I worked on folding tables with my stuff in piles on the floor, which was definitely not glam. But it was gratifying, and I am so happy with how it turned out. The kids love having their own spaces and being able to spend time in the office with me! And it’s so great to have a spot for the team to meet and collaborate together.
What do you think of my process? Any surprises? Any questions? I’d LOVE to hear from you.
Want to become the most organized person you know?
Together, we can get you there! Join my email list + become a Grid + Glam Insider to receive our newsletter, free printables, and other insider offers.
Disclosure: I only recommend products that I genuinely use and love. Some of the links above are affiliate links. This means that at no additional cost to you, I will earn a small commission if you click through and make a purchase.


